I believe this is an easiest way to remove the background from a picture on Macbook.
1. Open the picture file with preview.
2. Click Markup Toolbar and select instant Alpha
3. You can drag on the background you want to remove and delete it.
4. Save the file and put the file on PowerPoint or other program to check it.
*********************************************************************************
The following video will show how to remove the background from a real picture on mac with same manner explained above.
The Newton-Cotes integration formulas are common approximations in many numerical integration methods. Simply, the complicated function would be replaced with an approximation function.
f(x) and f1(x) are the complicated function and an approximation function, repectively.
Using easy approximation function won't bring a perfect answer like an analytical way, called for finite integration. However, it would be a best way when the function is too complicated to be calculated with the techniques we learned in calculus classes.
There are several types of approximations so we are going to start with trapezoid rule.
1. Trapezoid rule
This equations is derived from the following interpolation equation that will be posed soon.
After rearrangement f1(x), it should be integrated from a to b.
Finally we could get the first equation.
Example question.
from a=0 to b=0.8.
Solve
1) Calculate the equation analytically.
= 1.640533
2) Use the Trapezoid equation
f(0) = 0.2, f(0.8) = 0.232
3) Calculate Error
[(Analytical value - approximation value) / Analytical Value] x 100 = ?
[(1.640533 - 0.1728) / 1.640533] x 100 = 89.5 %.
4) Interpretation
The trapezoid rule is based on interpolation so lower number of segments will cause higher error percentages. The following two graphic can show the rule easily.
Hello!
The following information is about fuel level sensor` issue of 2009 Hyundai Santa Fe GLS 2.7L. I am not an expert or a well-trained mechanic but I want to replace it by myself. I would like to share my experience cuz it would be helpful for DIY peoples like me.
If you have a questions, don't hesitate! Email Me! studymachine015@gmail.com
D-25
I visited to a garage to put a scanner on my car because check engine sign has been turned on.
According to the technician from the garage, my car has a problem in fuel sender.
D-25 ~ D-14
I searched information such as part numbers, the location of it, .... and I decided to fix it by myself.
1) I downloaded a maintenance manual for 2007 Hyundai Santa Fe 3.3L from slideshare.net and I found the locations of fuel senders. They are located under the rear seats.
2) How to know the part number?
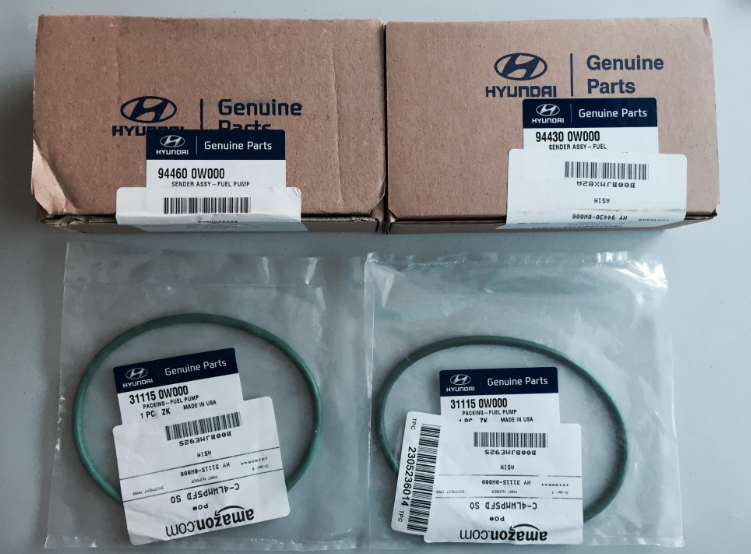
The following part numbers had been checked from hyundaipartsdeal.com. I checked many websites offering Hyundai parts but they used different part numbers, which I guess they made.
Left side fuel level sensor assembly - 94430
Right side fuel level sensor assembly - 94460
and I searched the parts in canadapartsonline.com but they says they don't have the parts.
So.. I checked ebay and amazon. Finally, I decided to order from Amazon.
D-12
The parts had been ordered.
D-6
My beautiful new parts have been arrived. Viva La Vie!
Before starting my DIY fixation, I will make a plan and post which tools are needed.
D-3
Even though petrol santa fe is not selling in South Korea as you know Hyundai is Korean company, they are offering useful maintenance guide for DIY peoples.
According to the manual,
Step 1. Remove the rear seats.
Step 2. Take off the the piece of cover (A).
Step 3. Remove the fuel sender service cover (A)
Step 4. Disconnect order is A, B, C, D, and E.
Step. 5 Finally you can access to the fuel sender.
Those are all information I collected from internet.
What need?
For removing the rear seats, I may need more basic tools.
After fuel sender replacement, I will post my working video. Thanks.
D-day.
As I planned, I performed from step 1 ~ 4... but..... but I couldn't remove the lock ring(right picture) of fuel sender assembly. So... I visited to some mechanic shops and I realized I need a special tool, named for
OTC 6599 Universal Fuel Sender Lock Tool.
So... I ordered the fuel sender lock tool(left image) via amazon.
I think the new tool will be arrived within 5 days. In next time, my video will be started from the start to the end including how to remove the lock ring of the fuel sender assembly. Thanks.
D+9 Days Finally, I replaced two fuel level sensors in my Santa fe and it is working perfectly. NO PROBLEM ANYMORE!!! Following video is my final work record. If you are considering to replace the sensors by yourself(DIY) and have some questions, please read this post carefully and watch the following video. If you still have a question, don't hesitate it. Email me: studymachine015@gmail.com
Thanks.
!!!!!!!!!!-------Caution-------!!!!!!!!!!!!
When you try to remove the lock ring, they will be very tightly locked so it will be really hard to remove it without breaking your valuable tools. So... you can try my way.
The lock ring is held by 5~6 ring holders like the yellow circles. The ring will be unscrewed by counter-clockwise direction so you can easily remove it if you the ring holders up like following drawing.
With a flat-screwdriver and a small hammer, I had hit the red point in every ring holding points and I removed the ring with the universal lock tools easily. Of course, you should hit it back in re-assembling steps.
I wish this info help your work and Thank Tommy O for your comment about it.
If you have a question or want to add any comment, please let me know. :) Thanks Guis~~~ :)

 and select instant Alpha